Sunday, June 26, 2011

Happy Birthday Master J!

 Today is my nephew's 5th birthday, 
Happy Birthday buddy.

We hope you had a fantastic day!!!

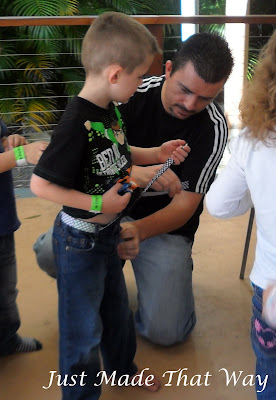
My bother Damien & J

Master J had a birthday party at King country,  
yesterday with family and some of his school friends.


His Mum made him a Grimlock(Transformers) cake. pretty cool huh! 


 No birthday is complete without some handmade presents from his favourite Auntie. 


I made him a card using everyday paper dolls cricut cartridge,


A hoodie using a LBB pattern


And a patchwork belt (let me know if your interested in a tutorial)
Master J loved his belt so much he had to 
wear it straight away
 

I really enjoyed creating some little boy things, a nice
change from girly pink.


Tuesday, June 21, 2011

Thirty Before Thirty!


I recently came across this darling blog Making it lovely. 
Nicole's blog truly is amazing, one thing I really 
loved was a her 30 before thirty list.

So I was inspired to write my own,
as I will be turning The Big. Three. Oh! on the 21st of December.
 
Source

That gives me six months to do all of the things on my list…

Wow! I can't believe it, but I'm actually looking forward to my 
birthday(this is a 1st for me) and feeling so incredibly blessed, because 
in those almost 30 years, nearly ten of those have been spent married to the love of my life and


almost nine of them have been spent relishing in my most grand adventure yet! Being a mother.
 I also have a very loving and supportive family

and I have made many wonderful friends.

 before I hit such a big milestone in my adult life;
I WANT TO...

1. Go on a date night with my Hubby.
2. Read a book. Half read, First to die James patterson
3. Print the gazillion photos I have stored on my computer and organize in albums.Never going to finish this one :(
4. Bake a pie from scratch. Done 22/6
5. Finish organizing my craft/sewing room. It's so close! 9/10
6. Fill new collage frames with my favourite family photos. Started 3/10
7. Sew a dress for myself. Half done!
8. Sew a dress for each of the girls. Started!
9. Give my bedroom a makeover. Started!
10. Learn to lead from my heart more and stop over thinking things so much (This is going to be a hard one). Really trying to!
11. Redesign my blog. Started!
12. Have a party to Celebrate my blogoversary. Done! 10-20/11
13. Open an online store to sell my handmade items (etsy maybe)
14. Have a new family portrait taken.
15. Get fit.
16. Treat myself to a manicure and pedicure. My good friend Sharon gave me GV, still need to use it though
17. Go to the markets/ thrifting. Done! 18/12
18. Have a whole day to myself crafting or sewing.
19. Go on a day trip somewhere new
20. Spend some mummy - daughter time with my girls  Done! Doing this regularly, the girls love it!
21. Take the girls to the museum Tried to the Museum is closed till 20th Jan
22. Kiss my sweetheart in the rain  Done!
23. Fill my art journal
24. Grow my own kitchen/veggie garden
25. Finish all my ufo's.  Yeah right this was never going to happen!
26. Go on a plane. Didn't happen :(
27. Go see Harry Potter Deathly hallows part 2 Done! 18/9
28. Spend a romantic weekend away with Sean at a Bed & Breakfast Not done!
29. Write a letter to my daughters.
30. New hair cut/colour. Half done! Coloured my hair


Thanks so much for reading,
Happy Tuesday everyone.

Thursday, June 16, 2011

A skirt for Boo!

It was my nieces Birthday a few weeks ago
and she loves skirts, so I couldn't resist whipping up one for her.
 

Boo's skirt is made using my skirt tutorial.


I love this fabric, the little birdies are gorgeous.
I wish I had some more of it. 


I even made her a matching flower, with the option of  wearing it in her hair or as a brooch. 

Let me know if your intereted in a tutorial on the fabric flower clip/brooch


To complete her present I made her a card using 
my create a critter, Cricut cartridge.

Happy creating...

Wednesday, June 15, 2011

My Gorgeous nieces and their dollies!


Popping in to share a photo my brother Damien recently emailed me. 
The pic was taken last weekend, while our sister Sharalee and her girls were visiting. 

I'm so pleased the girls love the dollies I made them for Christmas.
I originally posted about them HERE
  
Have a great day.

Wednesday, June 8, 2011

A Skirt for Sparkles + tutorial


 My sweet girly girly sparkles found this skirt at target on a recent shopping trip.


she was so pleased with her find that she was jumping up and down with excitement. unfortunately mummy wasn't willing to pay the $22 price tag, knowing she could make it herself for a lot less.

So that's what I did...


This is my version! Total cost about $8. 

Made from memory, as I only really glanced at the
targets version. I went back to later, especially to get a photo 
to show everyone my inspiration. 
 

Here's the tutorial
Please note measurement are made to fit my 5 year old daughter.


You will need basic ingredients; fabric for main skirt, voile or similar for underskirt, Tape measure, scissors, cotton, shirring elastic and a sewing machine of course. 
In this tutorial I also use an overlocker/serger which is useful, but not essential


 I cut a 12cm ( 5") yoke, 2 x 25 cm (10") pieces for main skirt and a 22cm (8.5") under skirt. All pieces are cut to the width of the fabric (112cm/ 44")


Overlock/serge (or zig zag stitch) the upper edge of yoke, then measure and iron a 1.5cm (5/8" ) hem (don't sew yet).


Then pin, right sides together the underskirt to the yoke, sew (overlock/serge) and iron seam toward underskirt. 

Next pin with right sides together one side seam of the main skirt , sew a 1.5cm (5/8")seam and iron the seam open.

 then stitch a rolled hem with my overlocker/serger (sewing a small hem by turning under 5mm (1/4") twice would work too) the upper edge of main skirt.

Next, sew two rows of  gathering stitch along the top of the main skirt piece. 

Then pin matching centre and sides of main skirt to the yoke,
centering the lines of gathering over the yoke to 
underskirt seam, (creating a ruffle).
then pulled up the threads to fit the yoke, leaving about 1.5cm (5/8") at edge free from gathers for the
seam allowance (making it easier to sew side seams later)


Once your happy with your gathering, stitch in place.


Now sew ten rows of shirring along the width of the yoke, with the first row 1cm (1/2") from edge stitching down the hem you ironed earlier. Lining up the presser foot with the last row stitched


We're almost finished! Pin with right sides together the side seam. Matching upper edges of the yoke, the shirring, etc and sew  a 1.5cm ( 5/8")  seam, keeping the underskirt clear (you'll sew this next) now overlock/serge (or zig zag) edges and iron the seam open. 
Next sew or overlock/serge underskirt side seam together.
Separating the main skirt and underskirt side seams, makes hemming the skirt easier.   


Now overlocking/sergeing the raw edge (turning under 5mm (1/4") will work too), then measure, iron and sew a 1.5cm (5/8") hem on the bottom edge of the main skirt.  And stitch a rolled hem on the underskirt with the overlocker/serger. 


I will swap this photo with a photo of sparkles wearing her skirt soon.
All finished.

Oh! And don't forget to remove your gathering stitches.
 Sparkle's loves her new skirt and told me its better than the Target skirt.

Please let me know what you think, I would love some feedback.
If you have any questions or would like measurements to make other sizes, please ask. I'm happy to help.

**Disclaimer: For personal use ONLY. Please do not use this tutorial for monetary gain. If you would like to share this on you blog, please link back to this post and/or give proper credit where credit is due! Thank you!**

Happy sewing 


Linking to these fantastic parties:
Tip me Tuesday/ Handmade projects @  Tip Junkie.
Crafty Soiree @ Yesterday on Tuesday
Feature yourself Friday @ Fingerprints on the Fridge
Friday link party @ Creation Corner
Show off your stuff @ Fireflies and jellybeans.
Make it wear it @ The Train To Crazy
Whatever Goes Wednesday @ Someday Crafts
Show me what ya got @ Not just a Housewife
Show and Tell @ Blue Cricket Design
Look at me Party @ It's FUN to Craft.
Making the world cuter Monday @ Making the world cuter
Talent Tuesday @ Vintage Wanna Bee
Take A Look Tuesday @ Sugar Bee Crafts
TOO Cute Tuesday @ Funky Polkadot Giraffe
Craftastic link party @ Sew can Do
craft catwalk @ Embellishing life
Sew darn crafty Party @ Sew Many Ways
K.I.S.S @ The Tattered Tag.
Weekend wrap up @ Tatertots and Jello
Sunday showcase @ Under the Table and dreaming
Sundae scoop @ I heart naptime
What ya got weekend @ Lolly Jane.
Free for all @ Young and Crafty
 I'm crafty Party @ SYTYC
Will see it Wednesday @ Fabric Bows and More.

Tuesday, June 7, 2011

All well layed plans go astray!


Hello friends 
Today I had planned to post a sewing tutorial, 
 BUT
  Little princess had play date with this little cutie this morning,
while his Mum went to a high school orientation with his older sister.

The kids snacked on tiny teddies while they watched Dora the explorer
 and played trains.
 Master T even proposed marriage to little princess, so cute....


Then about lunch time I took my little brother to an emergency dental appointment (ouch).
 Oh wait, he's not so little any more. He's more 
like a big brother now. 
Love you Ant


Before I knew it, it was time to pick my beautiful 
girls up from school. 

I'm hoping to have it ready for you tomorrow.

Happy crafting

Thursday, June 2, 2011

Dinosaur muesum

My beautiful paleontologist.
 Sparkles and her class mates over the last few weeks have been learning about dinosaurs, creating various prehistoric artworks and designing exhibits for a dinosaur museum.
Today they invited
parents to a special viewing of their creations.

Entry poster outside the class room.
The children created posters and hung them around the school, so students from other year levels could visit too.

Each child had their own very important job to do.

 The museum had an information desk.
 
a giant model of a Muttaburrasaurus, that they made out of boxes with egg carton teeth.
Papier Mache dinosaur eggs
 Fossils the kids made using plaster and objects they found in the playground.
some dinosaur skeletons
 
they even made some pterodactyls (cool huh!)
 and a gem shop with precious gems and jewellery.
 Here's my darling girl tallying my bill, after I chose a one of a kind necklace at the gem shop.

The museum was fantastic, their creativity makes 
me smile, I'm so proud of them.

Have a beautiful day.
myfreecopyright.com registered & protected
Related Posts Plugin for WordPress, Blogger...