Thursday, December 8, 2011

An Octopus for Mrs H.


My sweet girl, Sparkle's and the purple Octopus preps had their school 
Christmas/break-up party today!
Each Child took a plate of food and a secret 
Santa present(such a great idea). Only one school day left for 2011.

This afternoon many of the parents arrived at school early to join in the fun and watch a very sad Mrs H present all the children with special gifts (books, octopus badge & a bauble). We then(the parents) surprised and spoiled Mrs H with a book with photos of the children(more tears) and a gift voucher for a holiday.

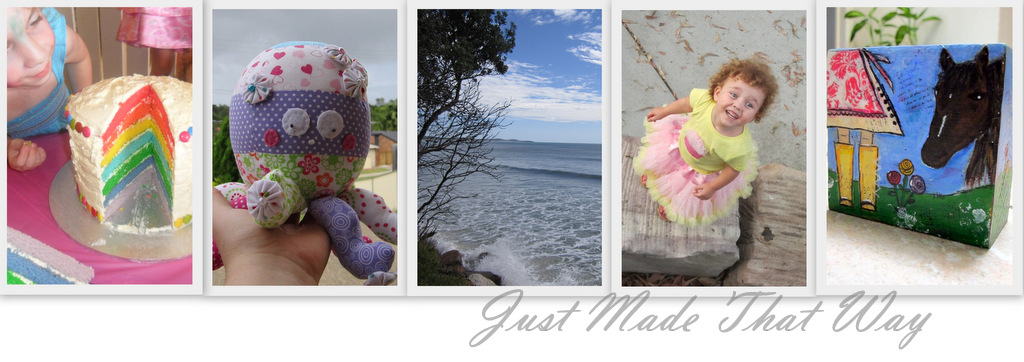
Me, being the sweetie that I am couldn't resist 
making Mrs H, something,


So I made her this cutie...

 
I found the pattern at Moda Bake Shop, earlier this year and
knew it would be the perfect gift.


Sparkle's helped me chose the fabric. As a final touch I stitched a 
heart on the tush with Sparkles name embroidered on it, so 
Mrs H will always remember my sweetie.


Mrs H loved her pretty Octopus!

A lovely gray & rainy sky in Brisbane this afternoon

I even impressed my hubby, he told me I astound him...

I have orders for more of them!
Happy Sewing
Linking to:
Sweet little Gals
Between U & Me
Yesterday On Tuesday
Vintage Wanna Bee
Bouffe e bambini
Night Owl Crafting
Polkadot on Parade
Trendy Treehouse
Not Just A Housewife
Embellishing life
Someday crafts
Free pretty things for you 
Blue Cricket Designs
Sew Much Ado
Clean & Scentsible

Tuesday, December 6, 2011

Scrapbook Layout - Vroom

 Hello my bloggy friends,
Just a quick share before I get the girls to school only 4 days 
left (including today) until they finish up the school. 
I can't believe how fast this year has flown by.

I created this LO,  while my Little Princess napped yesterday. 
It was inpired by a LO, I saw at my Favourite shop
I used Kasiercraft- On the move papers and die cuts.

 The photo's were taken mid 2001 at Harvey Bay, 
during a Motorkarna, Sean was competing in. 
He was driving his HZ Premier.
 Just need to add some journaling.

I hope you like it!


Happy crafting

Linking to:
Sarahndipities 
Cherished Bliss
Sugar Bee crafts
Homemaker on a Dime
Making the world Cuter
Not Just A Housewife

Sunday, December 4, 2011

Sumo's Sweet Stuff Pattern Winners!

Hi there, sweet friends!

Sorry this is so late.
The winners are:


Congratulation ladies!

I hope your having a beautiful Sunday...

Monday, November 28, 2011

Chrismas Card Giveaway Winner!


And the Winner Is?


Congratulations Karen

Happy Monday

Friday, November 25, 2011

Talk about Fun and games

I had to deal with a burst water pipe in the front yard this afternoon, there was that much water flooding the street that a neighbor called allconnect.
Talk about FUN!

Looking up into my wilderness of a garden where the water was coming from and a very wet gutter(road), the photo's were taken about an hour after the water was turned off at the mains.
I wish I had of got a photo before they turned the water off, but it happened right on school pick up. I hate to think how much water was wasted the meter was apparently spinning really fast, a couple of litres a minute :( 
While the plumber was fixing the problem, he only had the water turned slight on and there was still lots of water everywhere.
the poor guy had to cut out half my hedge and dig a huge hole.


I'm so glad its fixed and now have the water back on, but now there's a muddy mess in my 
yard that needs to be cleaned up :(


I hope you have a great weekend

Thursday, November 24, 2011

It keeps playing in my head!


I heard Lady Antebellum's song - Just A Kiss on the radio the other day. I have heard it before, but for some reason it has been stuck in my head ever since. I just had to share it with you!!!
It's such a beautiful song.


I wasn't feeling very well today (tummy bug), so when my sweet hubby arrived home from work
he surprised me with one their albums. I love him so much!!!


I hope you had a beautiful day...

Wednesday, November 23, 2011

Birdiful Stitches Patterns Giveaway Winners!!!


Hello there...
I know many of you are waiting to see the winners of the Birdiful Stitches Patterns!
so…here they are…


************


************


************

Congratulations Ladies!


For those of you that would like to enter the Sumo's Sweet Stuff Pattern Giveaway 
there's still time, as I have extended it to November 29!


Happy sewing!

Sunday, November 20, 2011

Blogoversary Party! {Day Eleven} JMTW's First ever Linky Party!

 Hello everyone!
Welcome to the last day of my blogoversary celebration,
I've had such a fantastic time and made so many new friends and thought what better way to finish off
my little blog's birthday party than to host my first ever creative link party!!!

Before we start I'd like to share a photo with you,
My gorgeous little Princess, turned 3 on Friday.
We celebrated on Saturday with a little party at the park, she's wearing her special outfit I made her.
Would you believe all my sweetie was worried about was where her cake was :)


Now it's your turn to share!

I'd LOVE  to see what you're been working on!
 Sewing, recipes, a scrapbook LO, even organizing, anything goes as long a you created it ...

Party rules!
1.  Please follow Just Made That Way!
2. Link up your creative projects - Family friendly only please!
(No Etsy stores or other linky parties please).
3. Please link directly to your post and not just your blogs main URL.
4. Please link back to Just Made That Way
5. Please visit other participants and leave them comments, everyone loves to meet new friends!

Most importantly have fun...

Saturday, November 19, 2011

Blogoversary Party! {Day Ten} A BIG Thankyou, A Creative share & A Giveaway! {closed}

Hi friends!  
My apologies for this post so being late, 
but better late than never, Right!

Welcome to day 10 of my Blogoversary Celebration...

Today, I'd like to start by Saying a big big Thank you to all my lovely guests that helped
celebrate my little blog's birthday! 
Your all amazingly talented and I loved having you on JMTW!

Just in-case you missed any of my special guests posts,
 Click on the links

Thanks again Ladies!

*****************

 I'm excited to share with you some Christmas cards I made.
The set includes 6 cards and  a matching folder to store them in.


They are made using Echo Park paper and embellishments - Season's Greeting, basil,
Spellbinders layered Poinsettia die, corner rounder punch, Threading water border punch,
ink, ribbon, twine and Kindy Glitz.


The cards would make a great gift or to give to family and friends.


I hope you like them!
because one of my lucky readers has the 
chance to win them...

Required Entry: Follow Just Made That Way blog {current or new} (1 entry)

After you do that, you may get additional entries by: 

Like Just Made That Way on Facebook (1 entry)
Facebook, or blog about the giveaway (1 entry for each completed)
**You must leave a separate comment for EACH entry 
and your email address in one comment- unless it is linked to your account** 


*Open to worldwide entries!*
 
Giveaway Closed Sunday, November 27th at Midnight AEST.  winner will be generated by random.org.  
Check back on November 28 to see if you won!

Have a beautiful day!

Friday, November 18, 2011

Blogoversary Party! {Day Nine} The Crafty Mummy Guest Post!


Welcome to day 9 of my Blogoversary Celebration...
Today is an extra special day, it's my youngest daughter's 3rd Birthday!
Happy Birthday Little Princess... 

I'd like to introduce you to Tonya from The Crafty Mummy, who is sharing a Christmas tutorial with us today.
She is also one of my lovely blogoversary Sponsors. I love making new friends, it's especially nice when their so close to home.


Hi! I’m CraftyMummy and I dabble in lots of different crafts – patchwork, quilting, cross-stitch, scrapbooking, knitting, crochet and sewing. I blog at TheCraftyMummy.com where I share the  projects I’ve done, and the projects I dream of getting to, plus some blogging and social media bits and pieces. I've been blogging for over 2 years and opened my online store on Madeit.com.au earlier this year.

I’m a stay-at-home mum to 2 gorgeous kids – yes, I’m very biased! – and I'm married to my best friend. We live in regional Queensland, Australia. Once upon a time I was a high school teacher in Brisbane and I’ve been known to teach a little piano too. But right now my number 1 job is to raise my kids and look after my home and family. I wouldn’t change that for the world!


Today I'm going to share a tutorial for a cute beaded wreath. This is quick and easy, and a great craft for the kids. You could hang them on the tree, use them as a decoration on a present, or give them as gifts to teachers or friends.


What you'll need:

  • beading wire - about 25cm - I used 24 gauge but slightly heavier would work too
  • assorted beads - I used 7 red & 7 green plastic tri-beads plus 28 little gold round beads


What to do:

    1. Cut your wire to about 25cm and band a little hook in one end (so those beads don't fall off!)
    2. Start threading on your beads. I alternated red and green beads with two gold beads in between them, but you could choose any colours.
    3. Once your beads are threaded, twist the wire into a circle. (Make sure you're happy with the size. Add more beads if you want to.)
    4. Slip the long end of the wire through the little loop and make sure the circle of beads is tight. Twist the wire a couple of times to secure it.
    5. Make the long end into a loop to hang.
    6. You could add a ribbon bow or make the wire short and tie on a ribbon to hang your decoration if preferred.
All done!  I also made beaded angels and beaded stars last Christmas so pop over to my blog to see them too. 
Thanks for having me, Rochelle.

Thursday, November 17, 2011

Blogoversay Party! { Day eight} Bumblebee and Sophie Guest Post!


Welcome to day 8 of my Blogoversary Celebration...
Today my special guest is Cindy from Bumblebee and Sophie, she is sharing a sewing tutorial - how to create a tunic neckline.
Cindy is sewing up a storm getting ready for 3 Craft Fairs this month, be sure to check out her blog and say hi.


Congratulations Rochelle!!  Happy  One Year Blogoversary!!
Thank you allowing me to participate in this celebration!

My name is Cindy, I live in New Hampshire, USA.  I am Mom to four grown and married children, (son and 3 daughters),  Grandma to two adorable little girls, and one grandchild on the way!  I have been sewing since I was a little girl(a long time), encouraged by the  legacy of my Grandmother and Mother, both very accomplished seamstresses. 

Bumblebee and Sophie started when I made my first Granddaughter, Sophia, her nursery bedding.   I had always wanted to have a sewing business, and with the help of Sarah (Sophia's Mommy) we started on this adventure.  I have taught a few quilting and sewing classes for friends, and I really enjoy passing on the skills that I have learned.  Hope you enjoy this post.


Sophia and Grandma at the Fryeburg Fair

The tunic neckline is really easy, making a facing for the slit opening on the outside rather than on the inside.  The fun part is you can make the front any shape you like, I have made points, squares, and a bit of a curve. (pictures to follow)

Tunic front

Decide what shape you want the placket to be on the front, I chose to do one with a point, measurements are up to you, the size of the garment and how large an area you want on the front of the tunic.  I also wanted the specific designs on the front so I "fussy cut" (a quilting term) the rectangle with what I wanted showing.

"Fussy" Cut Square

Made the point and turned under the edges.

Mark the Center of the tunic front with a pin
Place the placket you have pressed right side of placket to the wrong side of the tunic front with the center of the placket at the pin at the center of the tunic top.


Make three marks, for this 18 month tunic I measured down the center 3", then from the point at the bottom, I marked two more lines in a V shape the top lines about 1/2 " from the center line.  The outside lines are the sewing lines and the center line is the cut line.


Sew down one side and at the point make one stitch across the point, this will help the point lay flat, then sew up the other side.


Cut down the center line to just before the one stitch across the point

Turn the placket tot the front and pin and press the sewn edges and pin in place.


Top stitch close to the edge of the placket.
Proceed with the construction of the tunic...


Here are some other shape options for the placket.


Have fun !
Cindy


myfreecopyright.com registered & protected
Related Posts Plugin for WordPress, Blogger...